Release Android App to Huawei AppGallery via Azure Pipeline

Build and release app to Google Play Store / Apple App Store via Azure Pipeline is relative straightforward by following the template / task provided in Azure Pipeline. But there is no such template / task for app publish to Huawei AppGallery. The tutorial I found in Huawei developer forum doesn’t work correctly either. After a few try and error, I have finally found a solution. Noted that I already have a build pipeline configured to build the Android app into Android App Bundles (aab) and another release pipeline to publish the app to Google Play Store, so I’m not going to show here how to do build and sign the app, but focus on how to upload and submit the signed app to Huawei AppGallery instead.

I will not go very in depth on how Azure DevOps work. I also assume those who searching how to publish app to Huawei AppGallery via Azure pipeline should already experienced how to setup a release pipeline to publish to other store like Google Play Store. I also assume that you already publish the app to AppGallery before this.

Create API Client in AppGallery

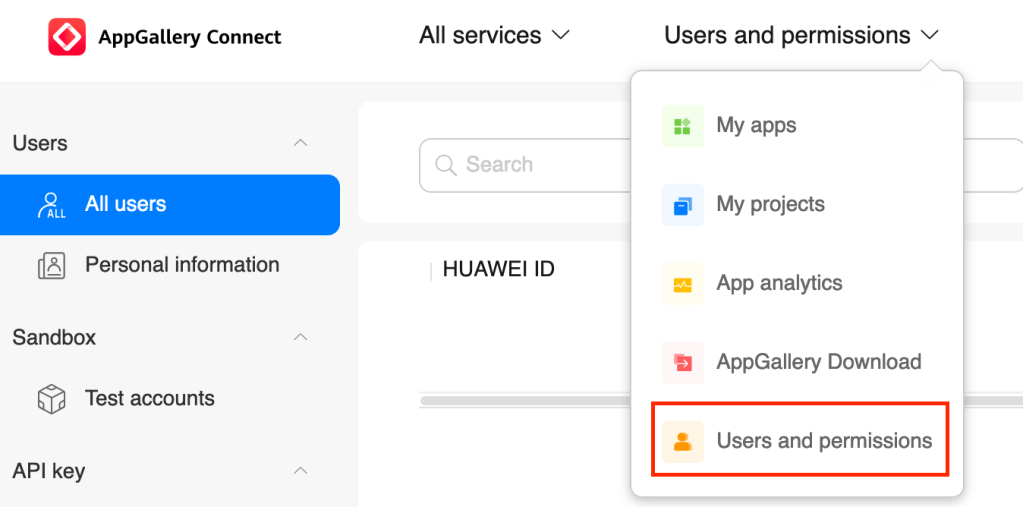
1. Login to Huawei AppGallery Connect.
2. Go to Users and permissions.

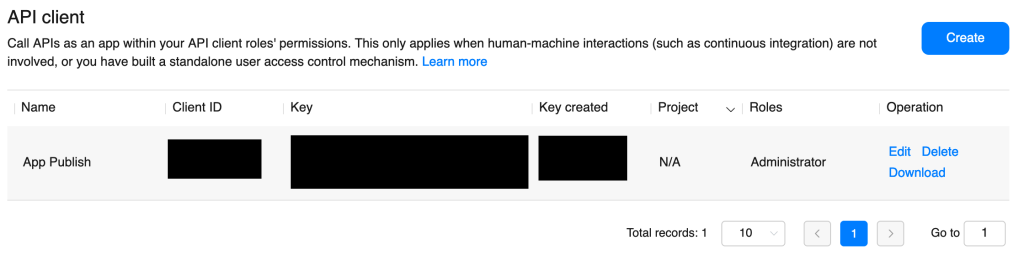
3. Go to Connect API then click Create on the right.

4. In Create API client, give it a name (example: App Publish) and assign the Administrator role. DO NOT assign a project to this client. Leave the project as N/A else Azure pipeline will fail with 403 error. Click OK to create the API client.

5. Remember / noted the Client ID and Key. You will need them later.

Get App ID

1. In Huawei AppGallery Connect, go to My App.

2. Select the app you want to publish.
3. Go to App Information on the left.
4. Remember / noted down the App ID. You will need it later.

Create A New Release Pipeline

1. Inside Azure DevOps, go to Release Pipelines.

2. Click on the New button and select New release pipeline to create a new release pipeline.

3. We will start with an Empty job without any template.

4. Since I already have a Android build pipeline setup and running already, I’m going to use the signed app (artifact) generated from that build pipeline as the source. This can be easily done by Add an artifact, then select the correct Project and Source (build pipeline). Important to remember the Source alias which we will need it later.

Add Tasks

Next, we already going to add task to the release pipeline. Go to Tasks.

Task 1: Install Python Request

  1. Add a command line task.
  2. Display name: Install Python request
  3. Script:
cd C:\hostedtoolcache\windows\Python\3.8.1\x64\Scripts

pip install requests

Task 2: Get AppGallery Access Token

  1. Add Python script task.
  2. Display name: Get AppGallery access token
  3. Script source: Inline
  4. Script:
import requests

json_data = {"client_id":"$(client_id)","client_secret":"$(client_secret)","grant_type":"client_credentials"}

req = requests.post("https://connect-api.cloud.huawei.com/api/oauth2/v1/token",json=json_data)

res_data = req.json()

res_data = "Bearer " + res_data['access_token']

print("##vso[task.setvariable variable=access_token]"+res_data)

Task 3: Get Upload URL

  1. Add Python script task.
  2. Display name: Get upload URL
  3. Script source: Inline
  4. Script:
import requests

headers = {
    'Authorization': '$(access_token)',
    'client_id': '$(client_id)'
}

url = 'https://connect-api.cloud.huawei.com/api/publish/v2/upload-url'

data = {
    'appId':'$(appId)',
    'suffix':'aab'
}
response = requests.get(url,headers=headers,params=data)
res_data = response.json()
print("##vso[task.setvariable variable=authCode]"+res_data['authCode'])
print("##vso[task.setvariable variable=uploadUrl]"+res_data['uploadUrl'])

Task 4: Upload File

  1. Add Python script task.
  2. Display name: Upload file
  3. Script source: Inline
  4. Script (Important: Replace Source Alias with the source alias from release pipeline):
import requests

filePath = r'$(System.DefaultWorkingDirectory)\<Source Alias>\Build\drop\$(fileName)'

files = {'file':open(filePath,'rb')}

data = {'authCode':'$(authCode)','fileCount':1}

reponse = requests.post('$(uploadUrl)',data=data,files=files)

text = reponse.json()

file_info = text['result']['UploadFileRsp']['fileInfoList'][0]

file_size = str(file_info['size'])

print("##vso[task.setvariable variable=fileDestUrl]"+file_info['fileDestUlr'])

print("##vso[task.setvariable variable=size]"+file_size)

Task 5: Update App File Info

  1. Add Python script task.
  2. Display name: Update app file info
  3. Script source: Inline
  4. Script (Important: replace en-US to language-region of the main language supported by your app):
import requests

file_size = int($(size))

headers = {
    'Authorization': '$(access_token)',
    'client_id': '$(client_id)'
}

params = {
    'appId':'$(appId)'
}

data = {'lang':'en-US','fileType':5,'files':[{'fileName':'$(fileName)','fileDestUrl':'$(fileDestUrl)','size':file_size,'imageResolution':'','imageResolutionSingature':''}]}

reponse = requests.put('https://connect-api.cloud.huawei.com/api/publish/v2/app-file-info',headers=headers,json=data,params=params)

text = reponse.json()

Task 6: Submit

  1. Add Python script task.
  2. Display name: Submit
  3. Script source: Inline
  4. Script:
import requests

headers = {'Authorization': '$(access_token)','client_id': '$(client_id)'}

params = {'appId': '$(appId)'}

r11 = requests.post("https://connect-api.cloud.huawei.com/api/publish/v2/app-submit",params=params,headers=headers)

res_data = r11.json()
print(res_data)

You should have a total of 6 tasks in your release pipeline by now.
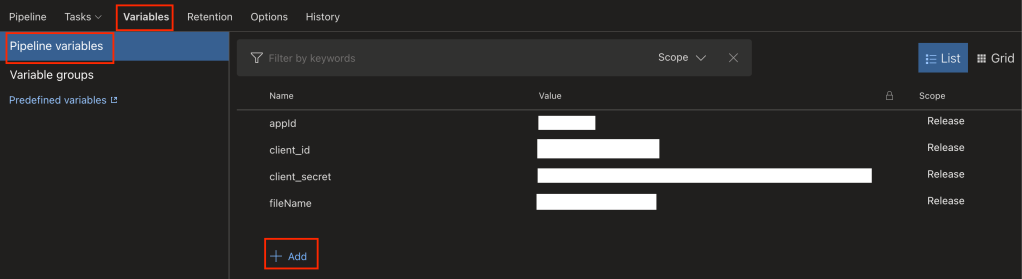
Add Variables

Next, we are going to add the variable with value taken from Huawei AppGallery in order to make the pipeline work.

  • Add “appId” variable with App ID retrieved from Huawei AppGallery.
  • Add “client_id” variable with Client Id from Huawei AppGallery.
  • Add “client_secret” variable with Key from Huawei AppGallery.
  • Add “fileName” variable with file name of signed app generated from release pipeline. (Refer to your previous build pipeline run if needed. Example com.app-Signed.aab)

Complete

Remember to click Save to save the whole setup. Click Create release to see if everything is setup correctly. If you have problem access to the API or there is any API change, you can refer to their AppGallery Connect API document.

How to Select Older iOS Simulator in Visual Studio for Mac

Sometime it is very useful to test on an older device to reproduce bug found by your other iOS users, but launching / select an older iOS simulator is not that straightforward compare with Android simulator which can easily be done in Visual Studio for Mac.

For iOS simulator, first you need to install the older version of iOS simulator from Xcode.

  1. Launch Xcode.
  2. Open Preferences by go to top menu > Xcode > Preferences.
  3. Open Components tab.
  4. Select and install the iOS simulator version you prefer by clicking on the small download button on the left.
  5. The download / installation might take some time.

Just install the older simulator is not enough, you need to manually create a simulator for this version too.

  1. Still inside Xcode.
  2. Open Devices and Simulators by go to the top menu > Window > Devices and Simulators.
  3. Switch to Simulators tab.
  4. Click the small + button on the bottom left.
  5. Enter a name for the simulator (it even suggested a name for you).
  6. Remember to select the correct iOS version you need.
  7. Click OK and you should see the newly created simulator added to the list of simulator on the left.

Once you have installed and created the iOS simulator. Then only Visual Studio for Mac will be able to show the new simulator in the simulator list. You might need to restart Visual Studio for Mac for the simulator list to be refreshed if Visual Studio for Mac already running when you create the simulator.

One thing to keep in mind that older simulator doesn’t get removed automatically when you update your Xcode.

Change Navigation Bar Color in iOS 15

If your app changed the color of navigation bar (background / foreground / text color / tint color), it is probably broken in the new iOS 15. Here is how I fix them in Xamarin:

if (UIDevice.CurrentDevice.CheckSystemVersion(15, 0))
{
    // change the background and text color of title bar
    var appearance = new UINavigationBarAppearance();
    appearance.ConfigureWithOpaqueBackground();
    appearance.BackgroundColor = CustomColor.AccentColor;
    appearance.TitleTextAttributes = new UIStringAttributes() { ForegroundColor = CustomColor.ForegroundColor };
    appearance.LargeTitleTextAttributes = new UIStringAttributes() { ForegroundColor = CustomColor.ForegroundColor };

    UINavigationBar.Appearance.StandardAppearance = appearance;
    UINavigationBar.Appearance.ScrollEdgeAppearance = appearance;
}
else
{
    // change the background color of title bar
    UINavigationBar.Appearance.BarTintColor = CustomColor.AccentColor;
    UINavigationBar.Appearance.Translucent = false;

    // change the title text color
    UINavigationBar.Appearance.TitleTextAttributes = new UIStringAttributes() { ForegroundColor = CustomColor.ForegroundColor };
}

// change the button color on navigation bar
UINavigationBar.Appearance.TintColor = CustomColor.ForegroundColor;

Android App Crash & Reboot OS / Phone

I’m been spending a whole weekend trying to hunt down a crash reported by one of my user who is running Samsung J3 on Android Oreo 8.1. The app launch then crash. It also bring down the whole Android OS and rebooted the phone. This is very unusual and because app crash normally won’t bring down the whole OS.

No crash report recorded on App Center (crash analytical tool I used) or Google Play Console which is understandable because whole OS is down). This make the debugging almost impossible since I cannot duplicate this on my phone nor emulator I tried. Since only 1 user reported, I suspect this is very much a isolated case.

After some deep search on the internet. It seem like Samsung Android phone have this cache partition that help app launch faster by caching some data in it. Some time it will become corrupted and causing random problem. Since wiping the cache partition doesn’t wipe any of the user data, I tell my user to give it a try. It work!

Here are the post on how to wipe the cache partition: https://us.community.samsung.com/t5/Phones/How-to-wipe-the-Cache-Partition-on-your-phone-or-tablet/td-p/12662

Xamarin UITest Finished Immediately After Run

I’m trying to rerun a few Xamarin UITest that I created a few months ago in Visual Studio 2017 on Android. As expected, they all failed, but not because of the test is outdated, but the tool is broken.

First thing I discovered that the test finished immediately once it started.

========= Run test finished: 0 run (0:00:00.5110016) ==========

After some search online, new version of Visual Studio messed the test tool by adding something new. To revert the changes that affect this, go to Tools > Options > Test > General > Active Solution then uncheck “For improved performance, only use test adapters in test assembly folder or as specified in runsettings file.

I have no idea why, but this solution is provide here: https://forums.xamarin.com/discussion/140234/what-causes-ui-tests-to-run-without-getting-a-pass-or-fail

You should also turn change the logging level to diagnostic because you properly need that later.

Everything should be smoonth now, but the test failed immediately with the following information (not error).

The running adb server is incompatible with the Android SDK version in use by UITest

Instead of messing with the platform-tools folder by downgrading adb version suggested by many. The actual solution is pretty simple, open the Android SDK, and delete any folder with platform-tools.oldXXXXXXXX (those X are number).

Source: https://stackoverflow.com/questions/52254881/cannot-run-xamarin-ui-test-on-xamarin-forms-error-system-exception

While switching back to Visual Studio Mac try to run the UITest on iOS simulator, I hitted with another problem. The iOS emulator failed to launch and no output is given. In turn out the old Xamarin.UITest version 2.2.6 I used is not compatible with XCode 10, by upgrading it to version 2.2.7. It run smooth again.

Gosh, so many trouble.

UnsatisfiedLinkError in Android 8.0

I received quite a number of crash reported in my Xamarin.Android app reported in Play Console with the following stack trace:

java.lang.UnsatisfiedLinkError
  at mono.android.Runtime.register (Native Method)
  at md5dd7a5194eb3bf67181b6a5c267c0f7e7.PushNotificationMessagingService. (PushNotificationMessagingService.java:15)
  at java.lang.Class.newInstance (Native Method)
  at android.app.ActivityThread.handleCreateService (ActivityThread.java:3470)
  at android.app.ActivityThread.-wrap4 (Unknown Source)
  at android.app.ActivityThread$H.handleMessage (ActivityThread.java:1748)
  at android.os.Handler.dispatchMessage (Handler.java:108)
  at android.os.Looper.loop (Looper.java:206)
  at android.app.ActivityThread.main (ActivityThread.java:6733)
  at java.lang.reflect.Method.invoke (Native Method)
  at com.android.internal.os.Zygote$MethodAndArgsCaller.run (Zygote.java:240)
  at com.android.internal.os.ZygoteInit.main (ZygoteInit.java:845)


I have no idea what crashed. The only thing it point to is the push notification services in the app with no additional information. They happen on Android 8.0 and above devices only. Android 8.0 above doesn’t required any special permission to receive notification. No similar crash reported in App Center (I use App Center as my crash reporting tool). Search online doesn’t return me anything meaningful. So I just ignore the error since no user complain anything to me.

Then today I found out that Android 8.0 and above required channel id when showing notification else it will crash in the background. Oh, snap, this is the problem! If you have simiar crash stack trace, this is probably the answer: https://blog.xamarin.com/android-oreo-notification-channels/

Failed to Launch Android Device Monitor

Every time I reformatted my machine and reinstall back Android Studio / Visual Studio. There are always some components in Android development tools are broken. It work perfectly previous, but now it doesn’t work on new freshly installed machine. It is always a new problem. This is annoying.

When I launch Android Device Monitor from Visual Studio 2017 or launch the android device monitor manually from executable. The following error pop up.

Failed to load the JNI shared library “C:\Program Files\Java\jdk1.8.0_181\bin\..\jre\bin\server\jvm.dll”

Depend on your installed JDK version, the error message might be different.

This is because Visual Studio tried to launch the x86 version of Android Device Monitor, while my machine only have x64 Java SDK / JDK installed, so it complain that. Unlike previous Visual Studio which install x86 JDK, all new Visual Studio now come with x64 JDK only.

Continue reading Failed to Launch Android Device Monitor

iOS WkWebview Return A Blank Screen / White Screen

Try to code your first example of WkWebview / UIWebView in your iOS app always return a blank screen or white screen? You are not alone. Apparently since iOS 9, all HTTP / non-secure web connection is block by default. It is something call App Transport Security (ATS).

You can add the following configuration into Info.plist to allow WkWebview / UIWebView to load HTTP / non-secure web page:

<key>NSAppTransportSecurity</key>
<dict>
    <key> NSAllowsArbitraryLoadsInWebContent</key>
    <true/>
</dict>

Or you can completely disable App Transport Security by

<key>NSAppTransportSecurity</key>
<dict>
    <key>NSAllowsArbitraryLoads</key>
    <true/>
</dict>

Source: https://developer.xamarin.com/guides/ios/application_fundamentals/ats/

Xamarin Test Recorder Installation: VSIXInstaller.NoApplicableSKUsException

I came across Xamarin Test Recorder a few days ago, and feel that it really can solve the pain I have with Appium which need a lot of work to write a single test. Give it a try to install but it fail with the following message below and no body in the marketplace review seem to know why and leave a one star review. Because no body care to read the description!

Continue reading Xamarin Test Recorder Installation: VSIXInstaller.NoApplicableSKUsException