If you came to this post, this mean you encounter the same problem as I am. Xamarin.Google.MLKit.Common.MlKitException Failed to initialize detector is throw when ObjectDetectorOptions.Builder() is call.
If we try to catch the error and inspect the inner error. The inner exception complain about: This file can not be opened as a file descriptor; it is probably compressed.
Ask any AI, all will suggest adding AndroidAapt2NoCompress tag under property group in csproj.
Build and release app to Google Play Store / Apple App Store via Azure Pipeline is relative straightforward by following the template / task provided in Azure Pipeline. But there is no such template / task for app publish to Huawei AppGallery. The tutorial I found in Huawei developer forum doesn’t work correctly either. After a few try and error, I have finally found a solution. Noted that I already have a build pipeline configured to build the Android app into Android App Bundles (aab) and another release pipeline to publish the app to Google Play Store, so I’m not going to show here how to do build and sign the app, but focus on how to upload and submit the signed app to Huawei AppGallery instead.
I will not go very in depth on how Azure DevOps work. I also assume those who searching how to publish app to Huawei AppGallery via Azure pipeline should already experienced how to setup a release pipeline to publish to other store like Google Play Store. I also assume that you already publish the app to AppGallery before this.
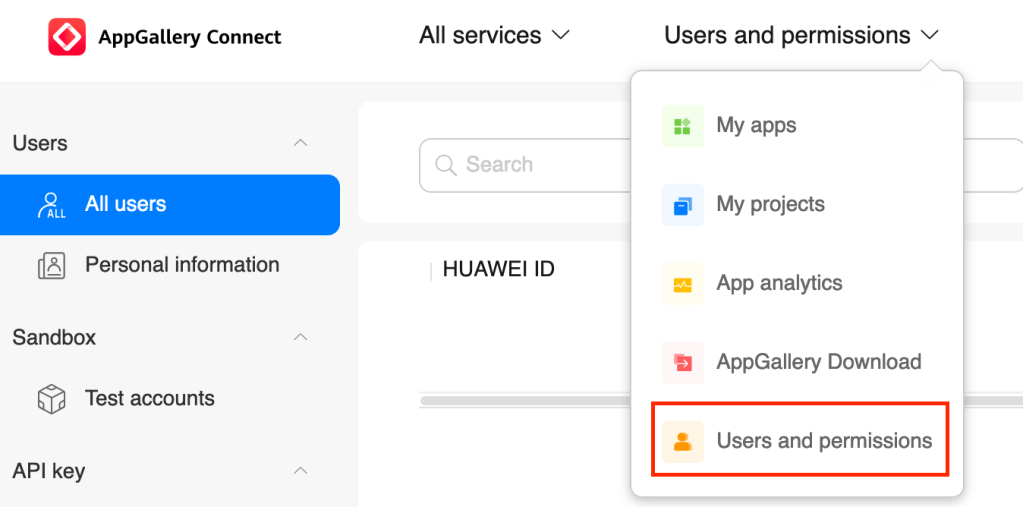
3. Go to Connect API then click Create on the right.
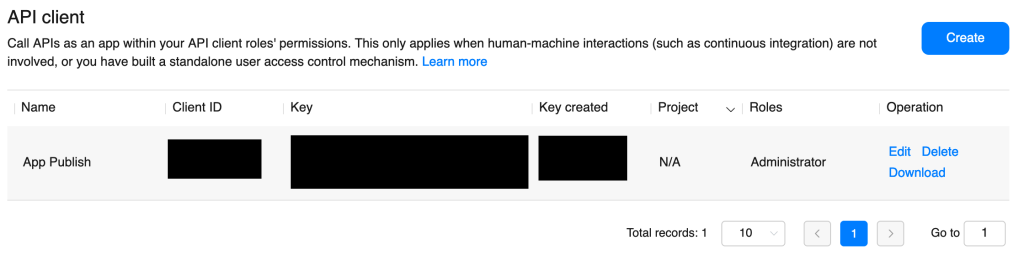
4. In Create API client, give it a name (example: App Publish) and assign the Administrator role. DO NOT assign a project to this client. Leave the project as N/A else Azure pipeline will fail with 403 error. Click OK to create the API client.
5. Remember / noted the Client ID and Key. You will need them later.
2. Select the app you want to publish. 3. Go to App Information on the left. 4. Remember / noted down the App ID. You will need it later.
Create A New Release Pipeline
1. Inside Azure DevOps, go to Release Pipelines.
2. Click on the New button and select New release pipeline to create a new release pipeline.
3. We will start with an Empty job without any template.
4. Since I already have a Android build pipeline setup and running already, I’m going to use the signed app (artifact) generated from that build pipeline as the source. This can be easily done by Add an artifact, then select the correct Project and Source (build pipeline). Important to remember the Source alias which we will need it later.
Add Tasks
Next, we already going to add task to the release pipeline. Go to Tasks.
Task 1: Install Python Request
Add a command line task.
Display name: Install Python request
Script:
cd C:\hostedtoolcache\windows\Python\3.8.1\x64\Scripts

pip install requests
You should have a total of 6 tasks in your release pipeline by now.
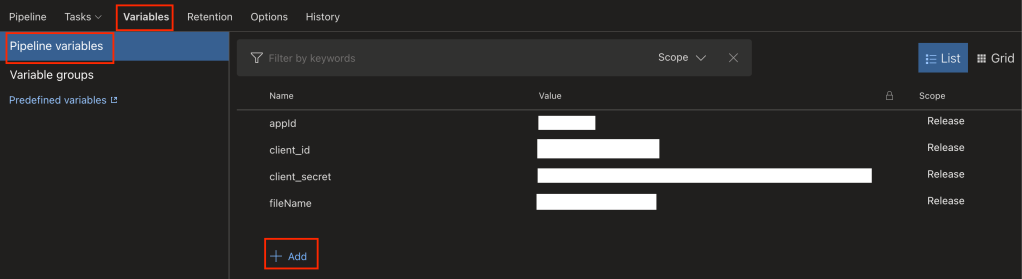
Add Variables
Next, we are going to add the variable with value taken from Huawei AppGallery in order to make the pipeline work.
Add “appId” variable with App ID retrieved from Huawei AppGallery.
Add “client_id” variable with Client Id from Huawei AppGallery.
Add “client_secret” variable with Key from Huawei AppGallery.
Add “fileName” variable with file name of signed app generated from release pipeline. (Refer to your previous build pipeline run if needed. Example com.app-Signed.aab)
Complete
Remember to click Save to save the whole setup. Click Create release to see if everything is setup correctly. If you have problem access to the API or there is any API change, you can refer to their AppGallery Connect API document.
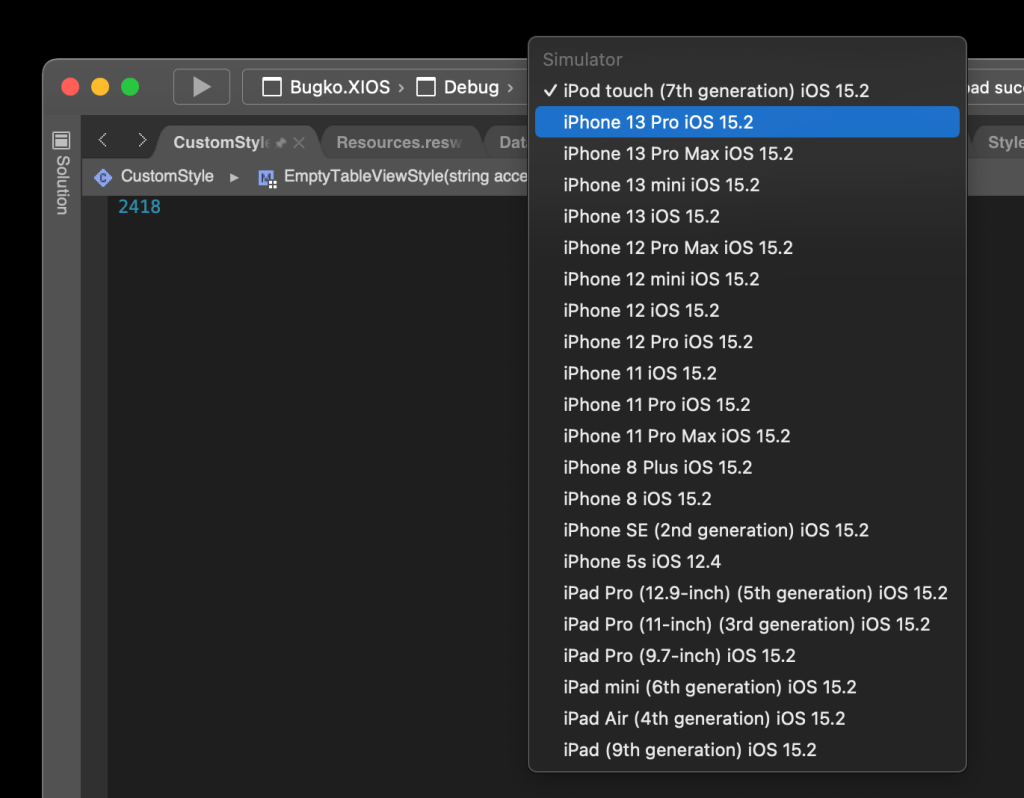
Sometime it is very useful to test on an older device to reproduce bug found by your other iOS users, but launching / select an older iOS simulator is not that straightforward compare with Android simulator which can easily be done in Visual Studio for Mac.
For iOS simulator, first you need to install the older version of iOS simulator from Xcode.
Launch Xcode.
Open Preferences by go to top menu > Xcode > Preferences.
Open Components tab.
Select and install the iOS simulator version you prefer by clicking on the small download button on the left.
The download / installation might take some time.
Just install the older simulator is not enough, you need to manually create a simulator for this version too.
Still inside Xcode.
Open Devices and Simulators by go to the top menu > Window > Devices and Simulators.
Switch to Simulators tab.
Click the small + button on the bottom left.
Enter a name for the simulator (it even suggested a name for you).
Remember to select the correct iOS version you need.
Click OK and you should see the newly created simulator added to the list of simulator on the left.
Once you have installed and created the iOS simulator. Then only Visual Studio for Mac will be able to show the new simulator in the simulator list. You might need to restart Visual Studio for Mac for the simulator list to be refreshed if Visual Studio for Mac already running when you create the simulator.
One thing to keep in mind that older simulator doesn’t get removed automatically when you update your Xcode.
A story which a programmer fight in the court alone against a company, with a lawyer and a forged evidence.
In 2018, I decided to quit my job at Intel to join a newly startup company, Boostorder (parent company: Instanture, sister company: Mango Fintech) believing their promise and future potential. Before that, I do all my homework before joining the startup. The company have received a new funding from a multinational company, financial check. One of my friends recommend the director as trustable, leadership check. I even visited the company myself to understand their work and product, all check. Obviously, they promised a lot, but do they actually deliver them is another story.
If your app changed the color of navigation bar (background / foreground / text color / tint color), it is probably broken in the new iOS 15. Here is how I fix them in Xamarin:
if (UIDevice.CurrentDevice.CheckSystemVersion(15, 0))
{
    // change the background and text color of title bar
    var appearance = new UINavigationBarAppearance();
    appearance.ConfigureWithOpaqueBackground();
    appearance.BackgroundColor = CustomColor.AccentColor;
    appearance.TitleTextAttributes = new UIStringAttributes() { ForegroundColor = CustomColor.ForegroundColor };
    appearance.LargeTitleTextAttributes = new UIStringAttributes() { ForegroundColor = CustomColor.ForegroundColor };

    UINavigationBar.Appearance.StandardAppearance = appearance;
    UINavigationBar.Appearance.ScrollEdgeAppearance = appearance;
}
else
{
    // change the background color of title bar
    UINavigationBar.Appearance.BarTintColor = CustomColor.AccentColor;
    UINavigationBar.Appearance.Translucent = false;

    // change the title text color
    UINavigationBar.Appearance.TitleTextAttributes = new UIStringAttributes() { ForegroundColor = CustomColor.ForegroundColor };
}

// change the button color on navigation bar
UINavigationBar.Appearance.TintColor = CustomColor.ForegroundColor;
A whole month, this random submission error 1201 and unproducible crash reported by certification team of Windows store promoted me to look for the problem and solution in my UWP app that never existed.
When submitting the app to Windows Store, the submission will typical fail within 5 minutes after pre-processing complete. The following error message is what shown:
This submission failed with error code(s) 1201 . More info about the error(s) can be found here.
Quick online search mention about using old Microsoft.NETCore.UniversalWindowsPlatform may caused this problem, but I’m using the latest version 6.2.8 which doesn’t have this problem. The certification team told me to resubmit the app because this might be just some random issue on the server, which I did and fail again. I recompile the whole package again and submit to Windows Store. Well, everything went wel…. crash, crash, crash!
Now certification team told me that my app crash on startup which I was not able to reproducible at all using the same package I submitted to Windows store. I even tested it on multiple different machine which different language and region configuration. So I did the same trick of recompile and submit. The app still crash on startup when certification team tried the app. Here are the stack track captured in crash report, although it make no sense to me.
Contacted certification support team, but the certification support team insist that I should contact the developer support team. Contacted the developer support team, but the developer support team insist that I should contact the certification support team. In the end, both doesn’t even provide any help or direction and keep quiet.
Long story, I rollback some changes and resubmit the app, everything went smooth. But none of the code I rollback look suspicious at all. In fact they aren’t. Add back the code and everything went hair wired again. In fact, during the app package compilation, .NET native toolchain start to fail, but I usually ignore them because they can be resolve by recompile again. In the end, I emailed .NET native team for help. This is what I get back.
We have seen similar symptoms when the compiler runs out of memory while compiling the app. Sometimes apps are on the edge, and timing around how memory is allocated is all that makes the difference between success and failure.
We have a 64 bit compiler available that can operate with more memory. Can you try to add <Use64BitCompiler>true</Use64BitCompiler> to a PropertyGroup in your main CSPROJ file?
You should be able to validate that it’s doing the right thing by enabling diagnostic build output in Visual Studio, switching build configuration to Release and building the project. In the build log, there should be a line with nutc_driver.exe in it. The nutc_driver.exe that was invoked should be in a tools64 directory (as opposed to the tools directory used by default).
-Michal
Adding Use64BitCompiler is a life saver! It totally work and the app went through submission without a problem at all minimum problem. Gosh, that took long enough! This is the few thing I learn:
Windows Store will re-compile your package submitted. I never knew that, I though they just testing the package procvided.
UWP app can grow big very quickly espcially if you use a lot of nuget libraries.
Bad archtecture design will cause .NET native to run to limitation much quicker, such as two view model is refering each other directly.
We really need a 64 bits Visual Studio.
If app submission still hitting error 1201, resubmit again until it success.
Install TamperMonkey on your Firefox browser first if you haven’t done yet. It should be as easy as any add-on install. TamperMonkey support Firefox Quantum, so it should have no problem running on the latest Firefox version. You should notice the TamperMonkey icon is added in the toolbar once you have it installed.
Many user ask us this question because they are not familiar / never use GitHub before. You doesn’t need any other tool or client program to download the code in GitHub. Since user script usually available in a single file, it is easy enough to just go and download that single file or direct copy in text form from there.
First go to the repository you are interested. Look for .user.js file. Click on it to open.
Encounter this error what trying to compile a Windows Phone 8.1 project: “Xaml Internal Error error WMC9999: Cannot find type System.ComponentModel.TypeDescriptionProvider in module System.dll”
What Caused
Playing around with my project by try to install Entity Framework from nuget, then remove them later. The compilation start to fail starting from there.
What Solution
Go to References, look for System.ComponentModel or System.ComponentModel.* references. In my case, it is the System.ComponentModel.DataAnnotations. Remove them and try recompile your project again. It should work now.
One day, one of my friends contacted me for a job offer. His company is hiring and he wish to recommend me to the manager. Let’s not mention about the company’s name. Hmm… it is a multi-nation company with M character in front, that’s all. So I think it is a great chances to try something different and it is a big company, why not give it a try, right?
Well, since it is big and well-known company, I assume there will be a lot of submission other than mine. I need a special and attractive resume to impress the manager. Something like infographic to represent my resume will be great. Honestly, I’m not really good with design or photoshop, so I need something simple yet good enough to stand out from others. In the end, I choose to use timeline and map base design to create my own visual resume.
Below are the first 2 pages of my resume. It is a summary of the whole resume in visual format. The first page show my working experiences, education and my own projects in timeline. While the second page show my worldwide achievements in a world map. I also afraid that some one might want to know more detail about my work from the resume, so I included another 6 pages of “boring” text base writeup with detail info after the visual resume.